输出层|PyTorch可视化理解卷积神经网络( 三 )
- 1.卷积层(Convolutional layer)
- 2.池层(Pooling layer)
- 3.全连接层(fully connected layer)
 文章插图
文章插图下面让我们看看每个图层起到的的作用:
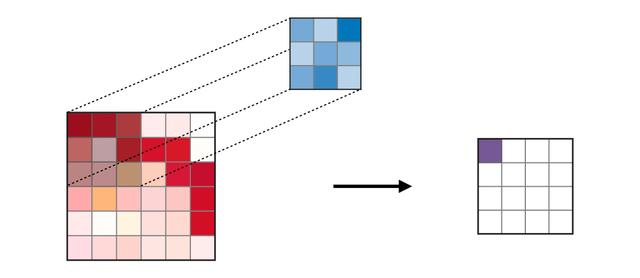
* 卷积层(CONV)——使用过滤器执行卷积操作 。 因为它扫描输入图像的尺寸 。 它的超参数包括滤波器大小 , 可以是2x2、3x3、4x4、5x5(或其它)和步长S 。 结果输出O称为特征映射或激活映射 , 具有使用输入层计算的所有特征和过滤器 。 下面描绘了应用卷积的工作过程:
 文章插图
文章插图卷积运算
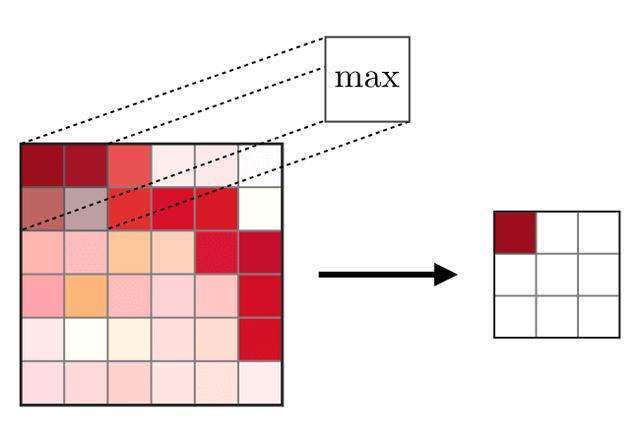
- 池化层(POOL)——用于特征的下采样 , 通常在卷积层之后应用 。 池化处理方式有多种类型 , 常见的是最大池化(max pooling)和平均池化(ave pooling) , 分别采用特征的最大值和平均值 。 下面描述了池化的工作过程:
 文章插图
文章插图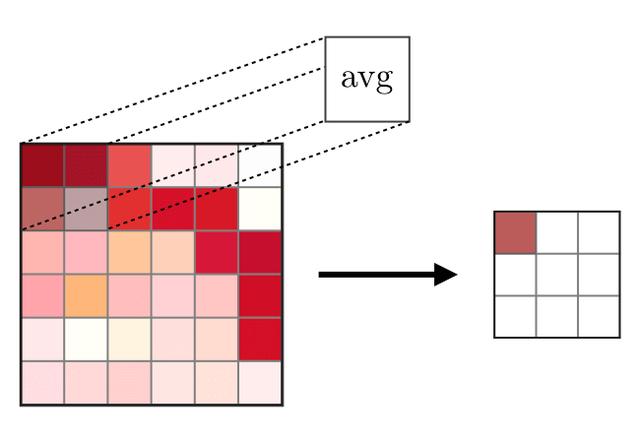 文章插图
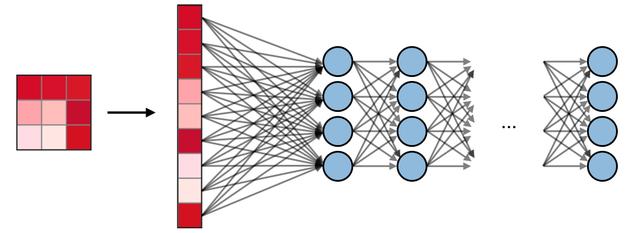
文章插图- ?全连接层(FC)——在展开的特征上进行操作 , 其中每个输入连接到所有的神经元 , 通常在网络末端用于将隐藏层连接到输出层 , 下图展示全连接层的工作过程:
 文章插图
文章插图在PyTorch中可视化CNN
在了解了CNN网络的全部构件后 , 现在让我们使用PyTorch框架实现CNN 。
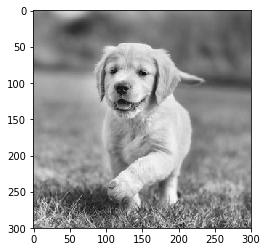
步骤1:加载输入图像:
import cv2import matplotlib.pyplot as plt%matplotlib inlineimg_path = 'dog.jpg'bgr_img = cv2.imread(img_path)gray_img = cv2.cvtColor(bgr_img, cv2.COLOR_BGR2GRAY)# Normalisegray_img = gray_img.astype("float32")/255plt.imshow(gray_img, cmap='gray')plt.show()
 文章插图
文章插图步骤2:可视化过滤器
对过滤器进行可视化 , 以更好地了解将使用哪些过滤器:
import numpy as npfilter_vals = np.array([ [-1, -1, 1, 1], [-1, -1, 1, 1], [-1, -1, 1, 1], [-1, -1, 1, 1]])print('Filter shape: ', filter_vals.shape)# Defining the Filtersfilter_1 = filter_valsfilter_2 = -filter_1filter_3 = filter_1.Tfilter_4 = -filter_3filters = np.array([filter_1, filter_2, filter_3, filter_4])# Check the Filtersfig = plt.figure(figsize=(10, 5))for i in range(4): ax = fig.add_subplot(1, 4, i+1, xticks=[], yticks=[]) ax.imshow(filters[i], cmap='gray') ax.set_title('Filter %s' % str(i+1)) width, height = filters[i].shape for x in range(width): for y in range(height): ax.annotate(str(filters[i][x][y]), xy=(y,x), color='white' if filters[i][x][y]<0 else 'black')步骤3:定义CNN模型
本文构建的CNN模型具有卷积层和最大池层 , 并且使用上述过滤器初始化权重:
import torchimport torch.nn as nnimport torch.nn.functional as F class Net(nn.Module):def __init__(self, weight): super(Net, self).__init__() # initializes the weights of the convolutional layer to be the weights of the 4 defined filters k_height, k_width = weight.shape[2:] # assumes there are 4 grayscale filters self.conv = nn.Conv2d(1, 4, kernel_size=(k_height, k_width), bias=False) # initializes the weights of the convolutional layer self.conv.weight = torch.nn.Parameter(weight) # define a pooling layer self.pool = nn.MaxPool2d(2, 2) def forward(self, x): # calculates the output of a convolutional layer # pre- and post-activation conv_x = self.conv(x) activated_x = F.relu(conv_x)# applies pooling layer pooled_x = self.pool(activated_x)# returns all layers return conv_x, activated_x, pooled_x # instantiate the model and set the weightsweight = torch.from_numpy(filters).unsqueeze(1).type(torch.FloatTensor)model = Net(weight)# print out the layer in the networkprint(model)Net(
(conv): Conv2d(1, 4, kernel_size=(4, 4), stride=(1, 1), bias=False)
(pool): MaxPool2d(kernel_size=2, stride=2, padding=0, dilation=1, ceil_mode=False)
)
步骤4:可视化过滤器
快速浏览一下所使用的过滤器
def viz_layer(layer, n_filters= 4): fig = plt.figure(figsize=(20, 20))for i in range(n_filters): ax = fig.add_subplot(1, n_filters, i+1) ax.imshow(np.squeeze(layer[0,i].data.numpy()), cmap='gray') ax.set_title('Output %s' % str(i+1))fig = plt.figure(figsize=(12, 6))fig.subplots_adjust(left=0, right=1.5, bottom=0.8, top=1, hspace=0.05, wspace=0.05)for i in range(4): ax = fig.add_subplot(1, 4, i+1, xticks=[], yticks=[]) ax.imshow(filters[i], cmap='gray') ax.set_title('Filter %s' % str(i+1))gray_img_tensor = torch.from_numpy(gray_img).unsqueeze(0).unsqueeze(1)
 文章插图
文章插图
- 前辈|八层板PCB展示,电脑主板PCB美图展示
- ColorOS、MIUI宿命对决:差距不只是底层,还有这方面
- 科天云远程音视频技术助企业数字化转型更上层楼
- 又爆新作!阿里甩出架构师进阶必备神仙笔记,底层知识全梳理
- 在Linux系统中安装深度学习框架Pytorch
- 网络层(TCP/IP协议)
- 自学电脑我来教你,必修掌握的ATX电源输出原理。
- 一款强大的音源输出工具
- 从底层理解this是什么
- 基层|全省首个、全国首创!萧山区发布城市大脑数字驾驶舱3.0版!打通基层数字治理“最后一公里”
