如何在PyTorch和TensorFlow中训练图像分类模型( 三 )
在TensorFlow中实施卷积神经网络(CNN)现在 , 让我们在TensorFlow中使用卷积神经网络解决相同的MNIST问题 。 与往常一样 , 我们将从导入库开始:
# importing the librariesimport tensorflow as tffrom tensorflow.keras import datasets, layers, modelsfrom tensorflow.keras.utils import to_categoricalimport matplotlib.pyplot as plt检查一下我们正在使用的TensorFlow的版本:
# version of tensorflowprint(tf.__version__) 文章插图
文章插图
因此 , 我们正在使用TensorFlow的2.2.0版本 。 现在让我们使用tensorflow.keras的数据集类加载MNIST数据集:
(train_images, train_labels), (test_images, test_labels) = datasets.mnist.load_data(path='mnist.npz')# Normalize pixel values to be between 0 and 1train_images, test_images = train_images / 255.0, test_images / 255.0在这里 , 我们已经加载了训练以及MNIST数据集的测试集 。 此外 , 我们已经将训练和测试图像的像素值标准化了 。 接下来 , 让我们可视化来自数据集的一些图像:
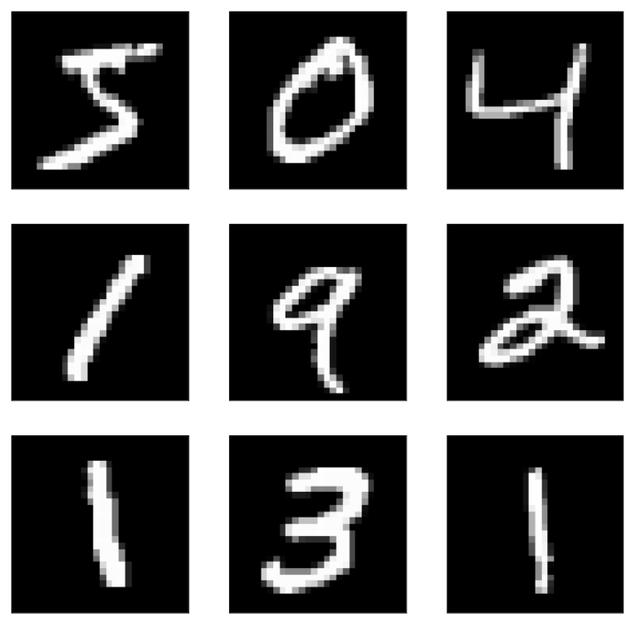
# visualizing a few imagesplt.figure(figsize=(10,10))for i in range(9):plt.subplot(3,3,i+1)plt.xticks([])plt.yticks([])plt.grid(False)plt.imshow(train_images[i], cmap='gray')plt.show() 文章插图
文章插图
这就是我们的数据集的样子 。 我们有手写数字的图像 。 再来看一下训练和测试集的形状:
# shape of the training and test set(train_images.shape, train_labels.shape), (test_images.shape, test_labels.shape) 文章插图
文章插图
因此 , 我们在训练集中有60,000张28乘28的图像 , 在测试集中有10,000张相同形状的图像 。 接下来 , 我们将调整图像的大小 , 并一键编码目标变量:
# reshaping the imagestrain_images = train_images.reshape((60000, 28, 28, 1))test_images = test_images.reshape((10000, 28, 28, 1))# one hot encoding the target variabletrain_labels = to_categorical(train_labels)test_labels = to_categorical(test_labels)定义模型体系结构现在 , 我们将定义模型的体系结构 。 我们将使用Pytorch中定义的相同架构 。 因此 , 我们的模型将是具有2个卷积层 , 以及最大池化层的组合 , 然后我们将有一个Flatten层 , 最后是一个有10个神经元的全连接层 , 因为我们有10个类 。
# defining the model architecturemodel = models.Sequential()model.add(layers.Conv2D(4, (3, 3), activation='relu', input_shape=(28, 28, 1)))model.add(layers.MaxPooling2D((2, 2), strides=2))model.add(layers.Conv2D(4, (3, 3), activation='relu'))model.add(layers.MaxPooling2D((2, 2), strides=2))model.add(layers.Flatten())model.add(layers.Dense(10, activation='softmax'))让我们快速看一下该模型的摘要:
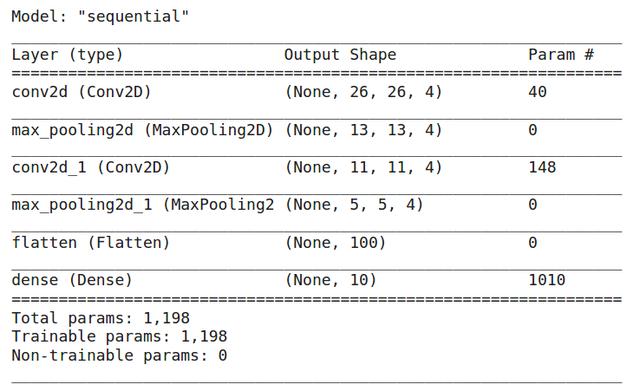
# summary of the modelmodel.summary() 文章插图
文章插图
总而言之 , 我们有2个卷积层 , 2个最大池层 , 一个Flatten层和一个全连接层 。 模型中的参数总数为1198个 。 现在我们的模型已经准备好了 , 我们将编译它:
# compiling the modelmodel.compile(optimizer='adam',loss='categorical_crossentropy',metrics=['accuracy'])我们正在使用Adam优化器 , 你也可以对其进行更改 。 损失函数被设置为分类交叉熵 , 因为我们正在解决一个多类分类问题 , 并且度量标准是‘accuracy’ 。 现在让我们训练模型10个时期
# training the modelhistory = model.fit(train_images, train_labels, epochs=10, validation_data=http://kandian.youth.cn/index/(test_images, test_labels)) 文章插图
文章插图
总而言之 , 最初 , 训练损失约为0.46 , 经过10个时期后 , 训练损失降至0.08 。 10个时期后的训练和验证准确性分别为97.31%和97.48% 。
因此 , 这就是我们可以在TensorFlow中训练CNN的方式 。
尾注【如何在PyTorch和TensorFlow中训练图像分类模型】总而言之 , 在本文中 , 我们首先研究了PyTorch和TensorFlow的简要概述 。 然后我们了解了MNIST手写数字分类的挑战 , 最后 , 在PyTorch和TensorFlow中使用CNN(卷积神经网络)建立了图像分类模型 。 现在 , 我希望你熟悉这两个框架 。 下一步 , 应对另一个图像分类挑战 , 并尝试同时使用PyTorch和TensorFlow来解决 。
- 页面|如何简单、快速制作流程图?上班族的画图技巧get
- 培育|跨境电商人才如何培育,长沙有“谱”了
- 抖音小店|抖音进军电商,短视频的商业模式与变现,创业者该如何抓住机遇?
- 计费|5G是如何计费的?
- 车轮旋转|牵引力控制系统是如何工作的?它有什么作用?
- 视频|短视频如何在前3秒吸引用户眼球?
- Vlog|中国Vlog|中国基建如何升级?看5G+智慧工地
- 涡轮|看法米特涡轮流量计如何让你得心应手
- 手机|OPPO手机该如何截屏?四种最简单的方法已汇总!
- 和谐|人民日报海外版今日聚焦云南西双版纳 看科技如何助力人象和谐
