这一次搞懂Spring自定义标签以及注解解析原理( 三 )
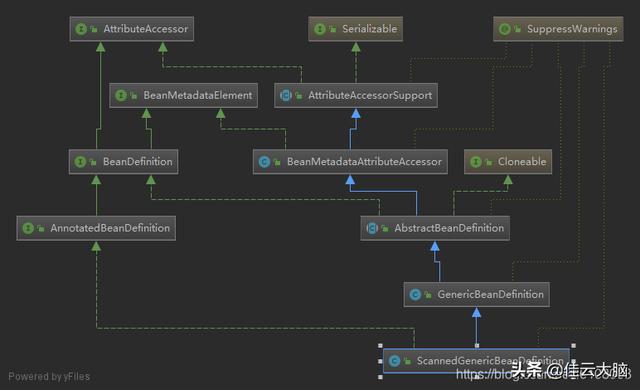
这个方法实现很复杂 , 首先是扫描找到符合条件的类并封装成BeanDefinition对象 , 接着去设置该对象是否可作为根据类型自动装配的标记 , 然后解析@Lazy、@Primary、@DependsOn等注解 , 最后才将其注册到容器中 。 需要注意的是和xml解析不同的是在扫描过程中 , 创建的是ScannedGenericBeanDefinition对象: 文章插图
文章插图
该类是GenericBeanDefinition对象的子类 , 并持有了AnnotationMetadata对象的引用 , 进入下面这行代码:
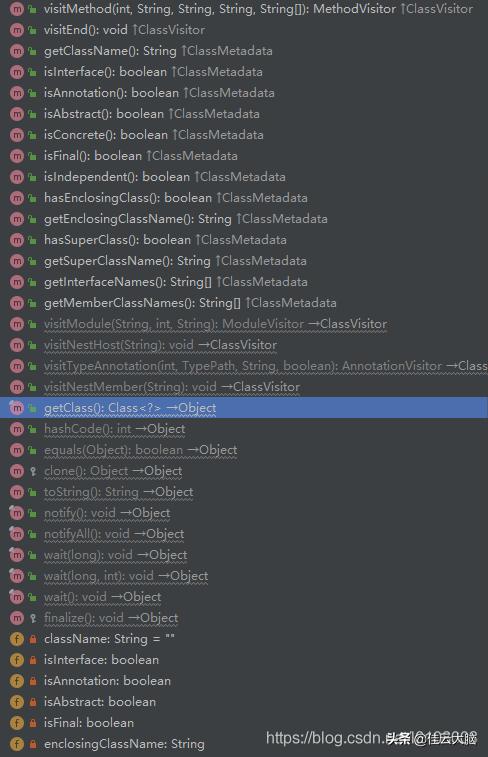
MetadataReader metadataReader = getMetadataReaderFactory().getMetadataReader(resource);我们可以发现AnnotationMetadata实际上是AnnotationMetadataReadingVisitor对象: 文章插图
文章插图
从上图中我们可以看到该对象具有很多属性 , 基本上包含了我们类的所有信息 , 所以后面在对象实例化时需要的信息都是来自于这里 。 以上就是Spring注解的扫描解析过程 , 现在还剩一个方法registerComponents , 它是做什么的呢?
protected void registerComponents(XmlReaderContext readerContext, Set beanDefinitions, Element element) {Object source = readerContext.extractSource(element);CompositeComponentDefinition compositeDef = new CompositeComponentDefinition(element.getTagName(), source);for (BeanDefinitionHolder beanDefHolder : beanDefinitions) {compositeDef.addNestedComponent(new BeanComponentDefinition(beanDefHolder));}// Register annotation config processors, if necessary.boolean annotationConfig = true;if (element.hasAttribute(ANNOTATION_CONFIG_ATTRIBUTE)) {annotationConfig = Boolean.valueOf(element.getAttribute(ANNOTATION_CONFIG_ATTRIBUTE));}if (annotationConfig) {Set processorDefinitions =AnnotationConfigUtils.registerAnnotationConfigProcessors(readerContext.getRegistry(), source);for (BeanDefinitionHolder processorDefinition : processorDefinitions) {compositeDef.addNestedComponent(new BeanComponentDefinition(processorDefinition));}}readerContext.fireComponentRegistered(compositeDef); }在该标签中有一个属性annotation-config , 该属性的作用是 , 当配置为true时 , 才会去注册一个个BeanPostProcessor类 , 这个类非常重要 , 比如:ConfigurationClassPostProcessor支持@Configuration注解 , AutowiredAnnotationBeanPostProcessor支持@Autowired注解 , CommonAnnotationBeanPostProcessor支持@Resource、@PostConstruct、@PreDestroy等注解 。 这里只是简单提提 , 详细分析留待后篇 。 至此 , 自定义标签和注解的解析原理就分析完了 , 下面就看看如何定义我们自己的标签 。
定义我们自己的标签通过上面的分析 , 我相信对于定义自己的标签流程应该大致清楚了 , 如下:
- 首先定义一个标签 , 并在classpath/META-INF文件夹下创建一个spring.schema文件 , 在文件中指定标签url和xsd文件的对应关系(xsd是定义标签规范的文件)
- 其次定义其NamespaceHandler类 , 让它继承NamespaceHandlerSupport类;
- 然后定义标签对应的解析器 , 并实现parse方法 , 在parse方法中解析我们的标签 , 将其封装为BeanDefinition对象并注册到容器中;
- 最后在classpath/META-INF文件夹下创建一个spring.handler文件 , 并定义标签的命名空间和NamespaceHandler的映射关系 。
http\://www.springframework.org/schema/context/spring-context-2.5.xsd=org/springframework/context/config/spring-context.xsd......http\://www.springframework.org/schema/cache/spring-cache.xsd=org/springframework/cache/config/spring-cache.xsd但是这个文件是在什么时候被读取的呢?是不是应该在解析xml之前就把规范设置好?实际上就是在调用XmlBeanDefinitionReader的doLoadDocument方法时读取的该文件: protected Document doLoadDocument(InputSource inputSource, Resource resource) throws Exception {return this.documentLoader.loadDocument(inputSource, getEntityResolver(), this.errorHandler,getValidationModeForResource(resource), isNamespaceAware()); } protected EntityResolver getEntityResolver() {if (this.entityResolver == null) {// Determine default EntityResolver to use.ResourceLoader resourceLoader = getResourceLoader();if (resourceLoader != null) {this.entityResolver = new ResourceEntityResolver(resourceLoader);}else {this.entityResolver = new DelegatingEntityResolver(getBeanClassLoader());}}return this.entityResolver; } public DelegatingEntityResolver(@Nullable ClassLoader classLoader) {this.dtdResolver = new BeansDtdResolver();this.schemaResolver = new PluggableSchemaResolver(classLoader); } public static final String DEFAULT_SCHEMA_MAPPINGS_LOCATION = "META-INF/spring.schemas"; public PluggableSchemaResolver(@Nullable ClassLoader classLoader) {this.classLoader = classLoader;this.schemaMappingsLocation = DEFAULT_SCHEMA_MAPPINGS_LOCATION; }
- Spring security CSRF 跨域访问限制问题
- 现在入手苹果11值吗,它跟12相比到底好在哪?看完算搞懂了
- Spring Boot搭建的一个在线文件预览系统
- 面试官:问你一个,Spring事务是如何传播的?
- 对Spring MVC接口进行Mock测试
- Spring Cloud Alibaba之 Sentinel
- SpringBoot+MyBatis+MySQL读写分离实现
- SpringBoot构造流程源码分析:Web应用类型推断
- 搭建私有Sentry日志收集系统并集成到springboot
- 让你彻底搞懂布隆过滤器!实现一个自己的BloomFilter
