Python绘制标准五星红旗致敬伟大的祖国
今年是建国71周年 , 先祝福祖国繁荣富强 , 愿天佑我中华永远昌盛 。 国庆假期将要过去一半 , 不知道大家出行旅途是否顺利 。 今天就和大家一起学习使用Turtle绘制一面标准的国旗 , 以致敬我们伟大的祖国 。 话不多说 , 先看动画!
 文章插图
文章插图
五星红旗
turtle中文名叫海龟 , 起初它是用来教小朋友学习编程的的一个库 , 难怪会取一个这么可爱的名字 。 不过 , 它的绘图功能十分的强大 , 可以制作出很多复杂的绘图 。 它是python的标准库 , 可以直接使用 。
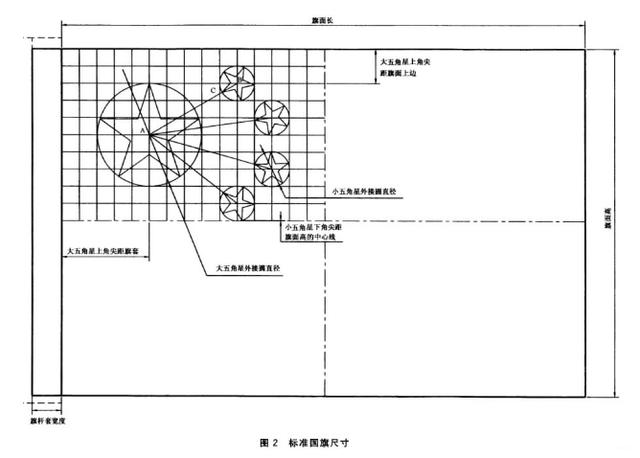
标准的国旗该怎么绘制?国旗的绘制是有明确的规定的 , 在《中华人民共和国国家标准国旗(GB 12982-2004)》 , 中明确规定了国旗的比例、颜色、每颗星的形状和具体位置等信息 。 我们可以参考这个标准进行绘制 。
 文章插图
文章插图
五星红旗设计图
看了上面的设计图 , 大家是不是很清晰了?我们可以看看下面的动图 , 会更加清楚整个绘制流程 。
 文章插图
文章插图
五星红旗绘制流程(公众号图片有失真 , 点击“阅读原文”查看清晰图片)
从设计图上看 , 国旗的长宽比是3:2 。 我们就把国旗的长定为900像素和600像素 , 为了显示效果就可以把显示窗口稍微定大一些1000:700 。 确定了国旗的大小 , 我们就可以进行绘制了 。 在绘制的过程中用到几个turtle库相关的函数 , 我们先熟悉一下 。
函数描述speed(speed)设置画笔移动速度,画笔绘制的速度范围[0,10]整数, 数字越大越快pencolor(color)设置画笔颜色fillcolor(color)设置填充颜色color(color)或color(color1, color2)同时设置画笔颜色和填充颜色begin_fill()准备开始填充图形end_fill()完成填充图形goto(x, y)移动画笔到(x, y)位置right(degree)顺时针移动degree度left(degree)逆时针移动degree度penup()提起笔移动 , 不绘制图形pendwon()放下画笔 , 移动时将绘制图形forward(distance)向当前画笔方向移动distance像素长度circle( r)画圆 , 半径为r 正(负) , 表示圆心在画笔的左边(右边)画圆setheading(angle)设置绝对旋转角度hideturtle()隐藏画笔done()停止绘画窗口不关闭
以上表格里就是我们将要用到的图形绘制的一些函数 , 熟悉了这些操作之后 , 我们一起绘制吧 , 下面的代码可供大家参考 。
其中 , auxiliaryLine 变量可以用来控制辅助线的绘制与否 , 如果设为False , 则将不会绘制辅助线 。
#!/usr/bin/env python3# -*-coding:utf-8-*-import turtle as tlimport math as m#画星星需要先指向圆心方向, d圆直径def drawStar(d):tl.pendown()tl.color('yellow')tl.begin_fill()tl.left(18)for i in range(5):tl.forward(d * 69 / 192)#五角角星长度与直径比69/192tl.left(72)tl.forward(d * 69 / 192)tl.right(144)tl.end_fill()tl.penup()def drawCircle(x, y, r):tl.penup()tl.setheading(0)tl.goto(x, y - r)tl.pendown()tl.circle(r)tl.penup()def drawLine(x1 ,y1, x2, y2):tl.penup()tl.goto(x1, y1)tl.down()tl.goto(x2, y2)tl.penup()length = 900width = 600step = length / 30auxiliaryLine = True#辅助线控制#设置窗口大小tl.setup(length + 100, width + 100)tl.speed(10)tl.penup()tl.goto(length/2 + 30, -width/2 - 30)tl.color("black")tl.write("欢迎关注公众号【Will的大食堂】", align="right", font=("楷体", 12, "bold"))#移动小乌龟到旗面左上角 画红旗的矩形tl.goto(-1 * length/2, width/2)tl.setheading(0)tl.pendown()tl.pencolor("red")tl.fillcolor("red")tl.begin_fill()tl.forward(length)tl.right(90) #方向 下tl.forward(width)tl.right(90) #方向 左tl.forward(length)tl.right(90) #方向 上tl.forward(width)tl.right(90) #方向 右tl.end_fill()tl.penup()if(auxiliaryLine):tl.pencolor("white")tl.setheading(0)for i in range(1, 11):tl.goto(-15*step, 10*step - i*step)tl.pendown()tl.forward(15*step)tl.penup()tl.setheading(-90)for i in range(1,16):tl.goto(-15*step + i*step, 10*step)tl.pendown()tl.forward(10*step)tl.penup()#主星: 圆心(-10 ,5), 半径=3if (auxiliaryLine):tl.pencolor("white")drawCircle(-10*step, 5*step, 3*step)tl.goto(-10*step, 8*step)tl.setheading(-90)drawStar(6*step)#小星1: 圆心(-5 ,8), 半径=1if (auxiliaryLine):tl.pencolor("white")drawLine(-10*step, 5*step, -5*step, 8*step)drawCircle(-5*step, 8*step, step)tl.goto(-5*step, 8*step)tl.setheading(-90)angle1 = m.degrees(m.acos(3 / m.sqrt((3 ** 2) + (5 ** 2))))tl.right(angle1)tl.forward(step)tl.right(180)drawStar(2*step)#小星2: 圆心(-3, 6) 半径=1if (auxiliaryLine):tl.pencolor("white")drawLine(-10*step, 5*step, -3*step, 6*step)drawCircle(-3*step, 6*step, step)tl.goto(-3*step, 6*step) #圆心tl.setheading(-90)angle2 = m.degrees(m.acos(1 / m.sqrt(1**2 + 7 **2)))tl.right(angle2)tl.forward(step)tl.right(180)drawStar(2*step)#小星3: 圆心(-3 , 3) 半径=1if(auxiliaryLine):tl.pencolor("white")drawLine(-10*step, 5*step, -3*step, 3*step)drawCircle(-3*step, 3*step, step)tl.goto(-3*step, 3*step)tl.setheading(90)angle3 = m.degrees(m.acos(2 / m.sqrt(2**2 + 7**2)))tl.left(angle3)tl.forward(step)tl.left(180)drawStar(2*step)#小星4:圆心(-5 , 1) 半径=1if (auxiliaryLine):tl.pencolor("white")drawLine(-10*step, 5*step, -5*step, 1*step)drawCircle(-5*step, 1*step, step)tl.goto(-5*step, 1*step)tl.setheading(90)angle4 = m.degrees(m.acos(4 / m.sqrt(4**2 + 5**2)))tl.left(angle4)tl.forward(step)tl.left(180)drawStar(2*step)tl.hideturtle()tl.done()
- 第2天 | 12天搞定Python,运行环境(详细步骤)
- SOTA论文也未必能被接收,谷歌科学家谈顶会审稿标准
- Python高级技巧:用一行代码减少一半内存占用
- 手把手教你用python编程写一款自己的音乐下载器
- Python爬虫入门第一课:如何解析网页
- 刷爆全网的动态条形图,只需5行Python代码就能实现
- 让你的输出变得更帅,Python炫酷的颜色输出与进度条打印
- 斐波那契数列:python实现和可视化
- Python 3.9 正式发布!一图秒懂新特性
- Python解决同步验证码模拟登录问题
